• Sign up or login, and you'll have full access to opportunities of forum.

Using Photoshop

Go to CruxDreams.com
T

The Fallen Angel

Guest
I assume you have a photo editor. If not then download one from here http://ge.tt/83IiLDM/v/0?c
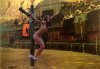
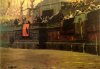
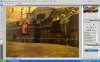
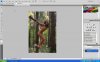
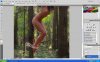
Unzip it, check it works OK then create a folder on your hard drive to store your pics in. I'm going to start with with simple copy and paste using the two attached pics. When you are ready I will continue. Col2 will be the background and IMG-0572-B is going to be in the foreground. When you have downloaded them run the mouse over the thumbnails to check that they are both about 950kb.
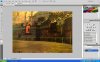
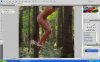
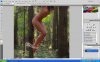
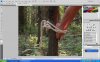
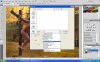
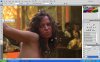
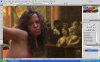
 

Attachments

  • col2.jpg
    col2.jpg
    983.6 KB · Views: 392
  • IMG_0572_B.jpg
    IMG_0572_B.jpg
    976.2 KB · Views: 392
Looks like this is a "portable" version of Photoshop CS4, nice.
Portable means "no installation", just run it!
I will try it with Photoshop and also in paralell with Corel Photopaint.

Who else is in the Classroom?
 
You can run it from a USB drive. I'm just getting some pics ready.
 
I have the CS5 (extended) portable in multiple languages
 

Attachments

  • Info.txt
    5.9 KB · Views: 47
  • photoshop portable cs5.jpg
    photoshop portable cs5.jpg
    283.8 KB · Views: 150
Thanks Hans. We'll soon be able to move on to that.
pic1. Open Photoshop and click on File in the top left corner then click on Open. Select Col2 to open.

Pic2. Now go to View along the top bar and select Fit on screen and you will see pic3.
 

Attachments

  • pic1.jpg
    pic1.jpg
    247.9 KB · Views: 165
  • pic2.jpg
    pic2.jpg
    604.9 KB · Views: 192
  • pic3.jpg
    pic3.jpg
    770.4 KB · Views: 186
pic4 Now go to File/Open and select IMG-0572. View/Fit on screen.

pic5 Use the magnifying glass to zoom in. Now choose the lasso tool (3rd down). Right click on it to make sure Polygonal lasso is selected.

pic6 Start at say posn1 and left click to leave a marker. Leaving plenty of markers work your way round cutting across from 3 to 4 as we want to omit the the triangle between legs and tree.

pic7 Follow the numbers cutting back from 9 to 10. When you get to 13 cut across to 14 and perform a similar routine with this triangle.
 

Attachments

  • pic4.jpg
    pic4.jpg
    476.6 KB · Views: 185
  • pic5.jpg
    pic5.jpg
    754.6 KB · Views: 174
  • pic6.jpg
    pic6.jpg
    749.7 KB · Views: 171
  • pic7.jpg
    pic7.jpg
    757.7 KB · Views: 165
pic8 To scroll the pic down simply move the mouse beyond top edge of pic. Continue leaving markers until you reach the bottom of the tree opposit posn1.

pic9 Now leave a marker at posn1 and thw whole cut out should shimmer. Now go to Edit/Copy the click on Col2 on the bar. This will bring up the background. Now click Edit/Paste.

pic10. She is now pasted as a layer on the background.

pic11. Using the Move tool at the top of the tools column you can move the layer. Now click on Layers/Flatten image.
 

Attachments

  • pic8.jpg
    pic8.jpg
    737.2 KB · Views: 164
  • pic9.jpg
    pic9.jpg
    735.6 KB · Views: 174
  • pic10.jpg
    pic10.jpg
    805.4 KB · Views: 186
  • pic11.jpg
    pic11.jpg
    806.9 KB · Views: 177
pic12. Now click File/Save as. on the pop up menu choose large image, a DIFFERENT name to Col2 and save as a jpeg.

Let me know how you got on. Plenty more to come.
 

Attachments

  • pic12.jpg
    pic12.jpg
    673.2 KB · Views: 88
To understand correctly: This method relies purely on placing accurate and enough pieces of straight masking lines, right?
In the hairs you have to make a compromise and you did avoid the transparent area of her hair tips, right?

Side remark: A mistake in placing a point may be undone by using the backspace key.

Questions:
- Is it possible to zoom in/out while working on the mask?
Found: "<ctrl> +" to zoom in, "<ctrl> -" to zoom out
- If the mask is finished (unintentionally), can it be split and completed or does one need to start all over?
 
1.The more straight lines the better. It is a polygonal lasso.
2.Hair is always a problem but is easily fixed with the clone tool..this comes next in touching up.
3.The backspace key can be used anytime as often as you wish.
4.The lasso has to be performed in one go so zooming in and out is not possible (I may be wrong on this). Zoom in close to begin with. You can push the mouse beyond the edges to reveal more picture.
5.You can copy and paste part of the mask then return and copy paste the rest. You would use the move tool to align the parts. Keep fingers clear of the right click on the mouse/
More later.
 
Ok, here is my "result".
I could have done better with accuracy of the mask.

As a note, I did struggle a bit with trying to understand how this "cutting across" would work.
At the end I did it differently, by masking the outline first and then removing the "triangles" using the "subtract mask" mode from the masking mode selection buttons under "EDIT" (see masking mode image for the other trainees ;)) and adding missed parts using the "add mask" mode.

One more question: Is it possible to save the work in the middle of it, including the masks?
I tried saving as PSD file, but when opening again, the masks are gone.
 

Attachments

  • MaskingMode.jpg
    MaskingMode.jpg
    6.4 KB · Views: 112
  • Class01.jpg
    Class01.jpg
    1.1 MB · Views: 140
4.The lasso has to be performed in one go so zooming in and out is not possible (I may be wrong on this). Zoom in close to begin with. You can push the mouse beyond the edges to reveal more picture.
Using
<ctrl> +
<ctrl> -
Zoom is possible while masking.

I solved the "masking in one go" problem by building the mask using "add" / "substract" areas. This makes it less critical, in case of a wrong click you loose not the whole mask but only the last part-area.
 
Good thinking. You learn as you go with Photoshop and end up using only a fraction of its capabilities. I'm only going through the basic tools. Next up is the restorers favourite tool..the clone stamp. I'm going to tidy up the hair in the last saved pic.
 
pic13
Open up the last saved pic and zoom in on the head. I'm going to clone from region a to region 1 to eliminate the green bit then from region b to the see through bits around 2. Going to work down back of head (3) cloning as i go to make it look more natural.
The clone tool is 9th down. Make sure you are on clone stamp.From the top bar select brush size 3 and opacity about 35%. Hover the mouse around region a and hold down Alt while you left click.You have now selected the region to clone from. Move the mouse to the green bit near 1. Hold down the left clicker on the mouse and start to paint. You can let go of left click any time and begin cloning from a different spot (Alt + left click).
Basically you select the region to copy then move the mouse to where you wish to copy. You can add more strands of hair (increase opacity). Now see if you can improve other edges of the pic using the clone stamp.
Let me know how you got on.
More to come. Save your pic as say test2.
 

Attachments

  • pic13.jpg
    pic13.jpg
    705.5 KB · Views: 132
  • pic14.jpg
    pic14.jpg
    616.5 KB · Views: 138
  • test2.jpg
    test2.jpg
    1.1 MB · Views: 161
Ok, two remarks here:
I had to "merge layers first, to combine the inserted cross with the background in order to be able to clone background into the hair (get rid of green background that was still there.
As I tried to copy most of the hair, I rather had to get rid of background instead of adding hair that was trimmed.

It took me a moment to understand how the clone tool works.
With <alt> "Leftclick" you select the "from" area and with the subsequent "leftclick" you define "distance and direction" to clone.
Subsequently any brushing will clone "from said distance and direction", what is indicated by the two crosses that show when the left mouse button is held down.
 
When you save a pic all layers are automatically flattened so I don't really understand why you had to merge the layers. It is a fact that all layers must be flattened before you can clone. As to how it works you have understood it exactly..I'm sorry if I found it so tricky to explain. As for technique in copying the backround rather than reproducing hair you also have got the idea 100%. Next time I want to add a shadow and perhaps a new character and work with live layers.
 
When you save a pic all layers are automatically flattened so I don't really understand why you had to merge the layers.
I didn't save it as a JPG but as a PSD (preserving layer info), that's why...
I was trying PSD in order to retain a semi-finished mask (no success however).
 
There are ways of saving the masks. I have used one before..will look it up.
 
Thanks, this sure is a helpful thing.
 
Back
Top Bottom