• Sign up or login, and you'll have full access to opportunities of forum.

Real Crux - The Making Of

Go to CruxDreams.com

mermaidhunter

Master Crucifixion Technician
The following Post is a description of how I pulled off the photo shoot of Real Crux - Dreams Do Come True. The photo shoot can be viewed at the following link:

http://www.cruxforums.com/xf/threads/real-crux-dreams-do-come-true.2850/

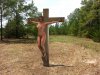
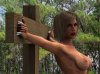
Some of asked if this was a "real crucifixion" as in, "Did I actually nail Randy to that cross as the pictures seem to imply?". The answer is no ........ absolutely not. Randy would never have agreed to that and in actuality I have no desire whatsoever to actually hurt another person in real life. My fantasies I can't explain. So in the interest of proving that this is all just theatrics I will explain how I pulled off what I think are very good fake images.
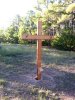
When Randy agreed to do this and I started trying to figure out how to pull his off, my original idea was to tie her to the cross in such a way that the ropes would only be marginally visible. This latter aspect would be to make it easy to photo-shop out the ropes. The cross was going to be hinged at the ground and mounted to a stand or base to allow it to be raised once she was tied on. This plan had several problems. First, I am not experienced enough at tying a woman for suspension that I was confident in doing it safely. Second, the base was going to be a major eye sore by the time I was going to be confident it wouldn't fall over. Third, how the hell was I going to stand this thing up by myself?
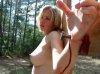
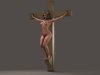
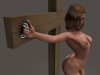
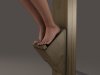
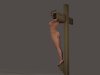
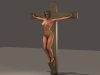
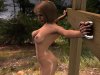
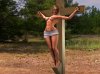
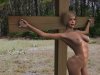
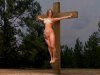
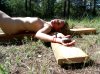
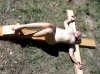
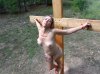
The simplest answers are usually the best. The first change to my original plan was to abandon the ropes and use "handles" for her to hold on to and a pedestal to stand on. This would be easier to photo-shop out and a lot safer. It also had the benefit that as she got tired, she could merely step down and take a break. The handles were originally as portrayed in my "artist concept" images, door or cabinet handle. I actually designed the cross in Poser, expanding and shrinking the "boxes" in the props section to resemble two by eights, throw on a texture and you have lumber. I eventually abandoned those for the "T' handles that could rotate. These provided a more natural angle to allow her hands to appear more like she was nailed as well as there being even less to photo-shop out. I was going to use wooden dowels for the handle but changed it to "rebar" so that I knew it would not break off under stress. I drilled and tapped threads into the holes so that there would not be a nut chafing against her fingers. The bolt is allowed to spin in the hole through the lumber allow the angle of her hand to change freely.


Here are the original images I did in Poser as a study to prove the concept.
 

Attachments

  • Untitled001.jpg
    Untitled001.jpg
    57.6 KB · Views: 1,873
  • Untitled002a.jpg
    Untitled002a.jpg
    137.2 KB · Views: 1,374
  • Untitled003.jpg
    Untitled003.jpg
    107.6 KB · Views: 1,075
  • Untitled007.jpg
    Untitled007.jpg
    50.2 KB · Views: 1,176
  • Untitled008.jpg
    Untitled008.jpg
    37.7 KB · Views: 936
  • Untitled012.jpg
    Untitled012.jpg
    69.3 KB · Views: 1,245
I actually almost got distracted making images in Poser, trying to improve the "Randy Clone" and the quality of the images. I eventually realized it was time to get out in the shop cutting wood and making a cross. I think some of my images towards the end were getting close to looking like Randy, but her face is so expressive that it was difficult for ME to capture in Poser. I also considered using a loin cloth, but ended up forgetting to try that. Here are some of the images that delayed me.
 

Attachments

  • REALCRUXX002.jpg
    REALCRUXX002.jpg
    300.3 KB · Views: 1,401
  • REALCRUXX003.jpg
    REALCRUXX003.jpg
    218.4 KB · Views: 1,028
  • REALCRUXX004.jpg
    REALCRUXX004.jpg
    273.1 KB · Views: 916
  • Untitled030.jpg
    Untitled030.jpg
    202.4 KB · Views: 1,090
  • Untitled032.jpg
    Untitled032.jpg
    272.4 KB · Views: 942
  • Untitled0202.jpg
    Untitled0202.jpg
    177.5 KB · Views: 1,110
The last problem now was how to make this thing not fall over, without having a monstrosity of an eye sore to look at or photo-shop out. After several design attempts and rejections I realized that the original crucifiers had the best idea........ dig a hole. With my new plan, she could lay on the cross for the "nailing" pics and then get off while I place it in the hole, then climb back on. Once I decided on a hole, I wanted to make sure it was stable and secure, no rocking etc., so I decided to dig a hole and then pour concrete with a hole the same size as the cross. This would allow the cross to slip in and out easily, but I would not have to worry about the dirt crumbling where the wedges were and the cross shifting. I ended up having to make a negative form to have a hole in the hole (you following me here?). I made a box just slightly thicker and wider than the base of the cross and set it in the hole. I poured the concrete in the space around it in the hole and allowed it to set. When I went to remove the form the next day, some of the form broke off at the bottom and I had a terrible time trying to figure out how to get it out. That was how I received my "sex related injury", from concrete chafing against my arms as I was reaching down in the hole.
Eventually I had a cross sitting in a hole and I got on it myself to prove it was strong enough to support Randy. Now I was ready for the photo shoot.
 

Attachments

  • theCross.jpg
    theCross.jpg
    192.1 KB · Views: 1,054
I made fake spikes out of Styrofoam and then gluing them onto Randy with theatrical glue, the blood was of course fake blood bought from the same place as the glue. The spikes kept falling over necessitating constant reinstallation. The blood came in a pint bottle like a bottle of brake fluid, I put some in an old soap dispenser and thinned it (a little too much probably) with water. I was able to use the dispenser to apply blood as necessary and fairly controlled. You can actually see blood drops in the dirt of some image if you look close enough. I thought that was pretty realistic. I also have a better idea as to how blood flows down an arm of a victim now. My future art will reflect that knowledge.

Once all the pictures were taken I downloaded and started picking images that I thought would be right for the final image set. Then I began photo-shopping out the hand holds. Some were easy as you can see in the attached photos. Some required repainting the fingers and hand. I was getting pretty good at photo-shop repainting by the time I was done.

Here are a few images that are not photo-shopped to remove the hand holds. Some are images that were not posted before.
 

Attachments

  • reveal247.JPG
    reveal247.JPG
    245.8 KB · Views: 1,603
  • reveal258.JPG
    reveal258.JPG
    322.1 KB · Views: 1,550
  • reveal261.JPG
    reveal261.JPG
    316.3 KB · Views: 1,576
  • reveal286.JPG
    reveal286.JPG
    256.2 KB · Views: 1,706
  • reveal317.JPG
    reveal317.JPG
    169.7 KB · Views: 1,482
I had intended to have some images of Randy being undressed, flogged and"The Nailing", but I was stupid and too distracted during my first ever photo-shoot to check the camera after every "take". I took high def video of the nailing and I was going to do some screen captures. I was going to do it that way because I had to swing the hammer and I don't have a remote for my camera. In hindsight I should have just used the camera timer. I think I forgot to hit "record" on the videocam for this take....... Duh! I didn't check until I got back home and had no video of this.

So after much deliberation, I decided that the premise or story I was going to portray along with the images was just too creepy and to just post the images. so I have video of Randy tied to a tree and being undressed and flogged. If I can find some software to cover my face, (I am not as brave as Randy) I may post that later on. I also have about 50 more images I may do something with later on.

All in all this project was very time consuming, but it was a blast! For two months I was consumed by this and I thoroughly enjoyed every aspect of it.

Now I need a new project! :cool:
 
MH Thank you (and Randy) for sharing your experience with us.

A few thoughts:

Rocks shoved into the hole around the base of the stipe will stabilize it as well as cement and make it easier to get out of the ground if you do need to extract it.

When you take your Master Crucifixion Technician (MCT) exam when get to the question "How do you stabilize the cross so it will not rock or lean?" the correct answer is ' D) Other' then add the note 'I'll wedge it enough it won't fall over. If she doesn't like it wobbling and rocking so much the better."

Tree

I will remember that pointer, thanks. :rolleyes:

But on a serious note, the cross goes in and out with no problem. The cross is now disassembled and stored in my shop. Waiting for a new victim!!! :cool:
 
I will remember that pointer, thanks. :rolleyes:

But on a serious note, the cross goes in and out with no problem. The cross is now disassembled and stored in my shop. Waiting for a new victim!!! :cool:

And we all eagerly await the outcome of that encounter!!:)
 
  • Like
Reactions: Pia
thanks for that account, mh, very interesting
and adds to the enjoyment of Randy's & your wonderful images.
To me such reports of the preparation and implementation of such a photo-shoot
can be almost as exciting as the actual product,
and if the process is recorded in pictures, all the more so.
I'd agree the blood is one feature that needs a little more work,
it flows pretty realistically, but the colour and texture don't seem quite right,
there needs to be a bit more purple in it, and a slightly more glutinous appearance -
but that's a small criticism and others may disagree.
and the perfect painted nails are very realistic isn't?:D
 
thank you for you shearing this info
you did a great job and I agree some times the simple way is the best way.
 
Good point about the fake blood. Now you know how it flows there's no need to buy any as you can always add it afterwards remembering that to look realistic it must be much darker than you would expect.
 
Mermaidhunter, thank you for the detailed explanation on how you accomplished this photo shoot. It does sound like a lot of thought and work went into this, and I thank you and Randy for doing all this. Randy is a brave and beautiful woman, you are lucky to find her.
 
Back
Top Bottom