

T
The Fallen Angel
Guest
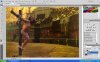
MAKING A SHADOW.
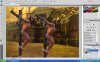
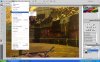
Without an effective shadow manips don't look real You may well find a simpler method than this.
1.In the bottom left there are two rectangles. Foreground and background colour. Click on top rectangle and select a suitable foreground Using your lasso tool brown colour.
2. Using the lasso tool go round the girl and cross..roughly. Use Edit/Copy then Edit/Paste. Use the Move tool to move the copy.
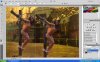
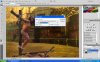
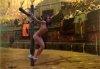
3. On the copy, right click and select Layer 1
4. Now click Edit/Free transform and rotate the copy.
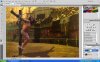
5. Right click inside the copy and select Distort.
6.Use the square tags to distort.
7. When satisfied click on Move tool and Apply.
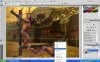
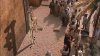
8. Now click on Layer/New Fill Layer/solid colour.
9. From New Layer Window tick "Use previous layer to create clipping mask."
11. From Solid Color window click OK
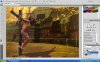
12.Right click on the "shadow" and select Layer 1
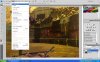
13.In the bottom right of the screen you can see Layers. Reduce the Fill to about 43%
14.Finally save the image.
I look forward to any quick method you may discover.
Without an effective shadow manips don't look real You may well find a simpler method than this.
1.In the bottom left there are two rectangles. Foreground and background colour. Click on top rectangle and select a suitable foreground Using your lasso tool brown colour.
2. Using the lasso tool go round the girl and cross..roughly. Use Edit/Copy then Edit/Paste. Use the Move tool to move the copy.
3. On the copy, right click and select Layer 1
4. Now click Edit/Free transform and rotate the copy.
5. Right click inside the copy and select Distort.
6.Use the square tags to distort.
7. When satisfied click on Move tool and Apply.
8. Now click on Layer/New Fill Layer/solid colour.
9. From New Layer Window tick "Use previous layer to create clipping mask."
11. From Solid Color window click OK
12.Right click on the "shadow" and select Layer 1
13.In the bottom right of the screen you can see Layers. Reduce the Fill to about 43%
14.Finally save the image.
I look forward to any quick method you may discover.
Attachments
-
 PtScr036.jpg832.7 KB · Views: 88
 -
 PtScr037.jpg840.8 KB · Views: 82
 -
 PtScr038.jpg840.7 KB · Views: 72
 -
 PtScr039.jpg772 KB · Views: 69
 -
 PtScr040.jpg824.4 KB · Views: 69
 -
 PtScr041.jpg771.2 KB · Views: 72
 -
 PtScr042.jpg812 KB · Views: 72
 -
 PtScr043.jpg803.5 KB · Views: 74
 -
 PtScr044.jpg808.2 KB · Views: 74
 -
 PtScr045.jpg811.5 KB · Views: 84
")


")